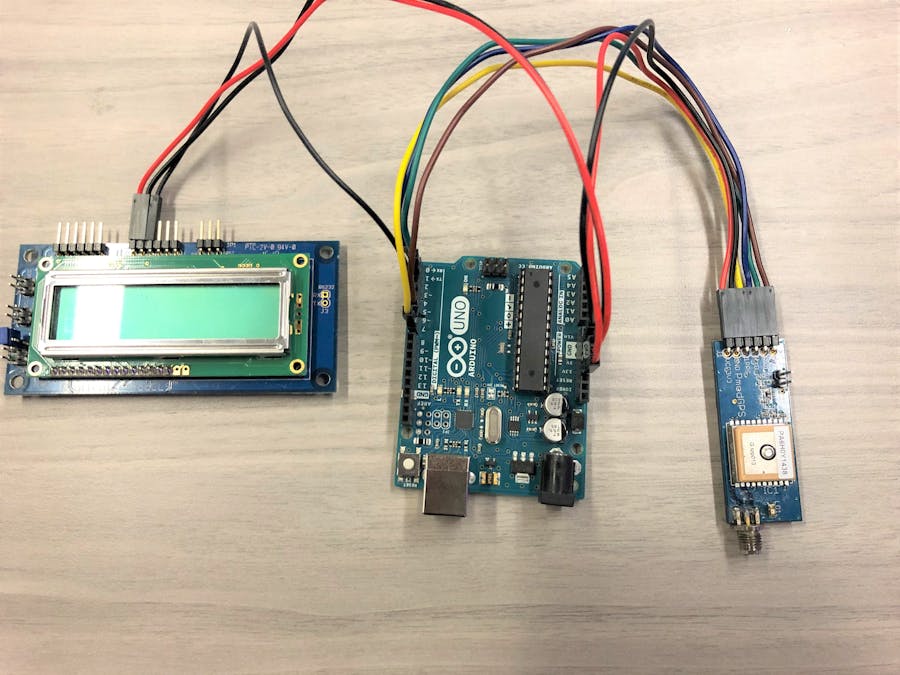
هذا المشروع هو نظام تتبع GPS مع شاشة LCD باستخدام Arduino Uno و Digilent PmodGPS
المكونات
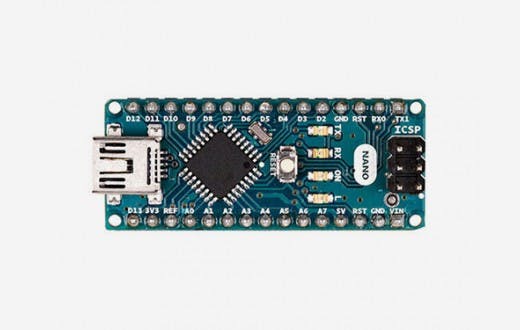
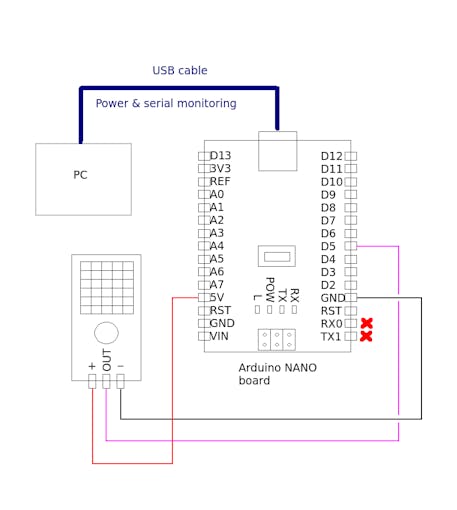
اردوينو اونو او جينون
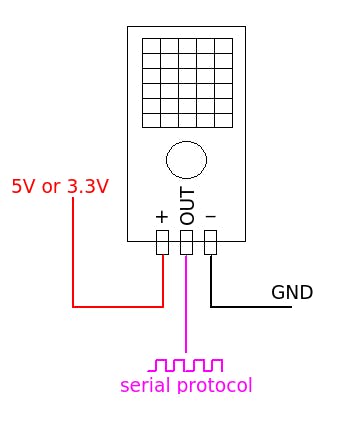
Digilent Pmod GPS
شاشة كرستالية
قصة
هذا المشروع بتسليط الضوء على استخدام PmodGPS من Digilent كمحدد موقع وتوجيه إلى نقطة مرجعية. يمكن أن يكون هذا مفيدًا للمتجولين ، أو الصيادين ، أو غيرهم من الملاحين في المواقف دون علامات أو علامات تحديد الموقع / الاتجاه الأخرى.
وصف
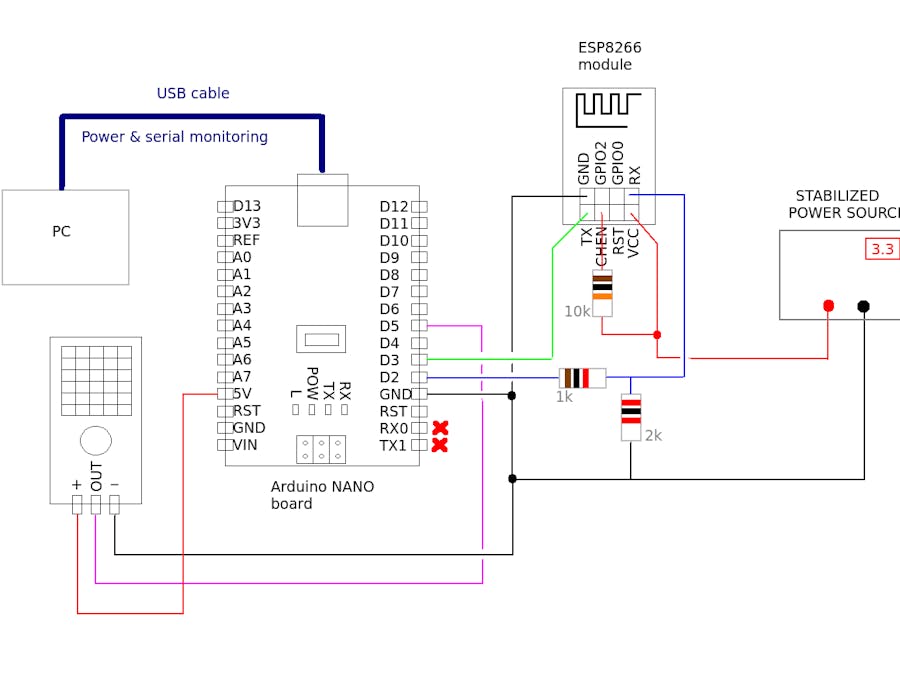
يستخدم هذا المشروع و Arduino Uno microcontroller ، شاشة PmodCLS LCD من Digilent ، و PmodGPS أيضًا من Digilent. تم تشجيع Arduino Uno لنا لاستخدامها في برمجة أسهل بدلاً من Verilog أو HDL. بمجرد التشغيل ، سيعرض هذا المشروع خطوط الطول والعرض والارتفاع والمسافة إلى المستخدم ، ونقطة زاوية ثابتة باتجاه نقطة مرجعية ثابتة ، وسرعة المستخدم ، بالإضافة إلى البيانات الأخرى التي يجب أن يختار المبرمج تنفيذها حيث أن هناك العديد من الوظائف الأخرى المتاحة لـ PmodGPS. يمكن تشغيل هذا النظام بواسطة بطارية USB متصلة لتطبيق الهاتف المحمول. فقط قم ببرمجة Arduino Uno ، قم بفصل جهاز الكمبيوتر الخاص بك ، قم بتوصيل بطارية USB ، ويجب على Arduino Uno مواصلة العمل كالمعتاد. يتم تعيين النقطة المرجعية في وقت إعادة ضبط النظام. يمكن تشغيل ذلك يدويًا بالضغط على زر إعادة الضبط على Arduino

************************************************************************/
#include <SoftwareSerial.h>
#include "PmodGPS.h"
//pin definitions
#define _3DFpin 6 //pin 6
#define _1PPSpin 7 //pin 7
//#define RSTpin reset //
typedef enum{
RESTART,
PREFIXED,
NOTFIXED,
FIXED
}STATE;
typedef enum{
DEGREES,
MINUTES,
SECONDS,
}GPSDATA;
GPS myGPS;
char* LAT;
char* LONG;
NMEA mode;
STATE state=RESTART;
GPSDATA gpsdata = DEGREES;
//declare and initialize global variables
String referenceLatitude,referenceLongitude;
String currentLatitude, currentLongitude;
float minutesToDegrees, secondsToDegrees;
float DDcurrentLatitude, DDcurrentLongitude;
float DDreferenceLatitude, DDreferenceLongitude;
float SeattleLatitude = 47.6062; //needed for local linearization
float directionDegrees, directionMagnitude;
//starts serial communication with GPS sensor
//displays to LCD to signify begining of code or system restart
void setup()
{
lcd.begin(9600); // Begin LCD
lcd.write("\x1b[j"); // Erase display
lcd.write("\x1b[0h"); // configuration of the display (write on 2 lines)
lcd.write("\x1b[0;5H"); // cursor is on line 1 and columm 5
lcd.print("Begin");
delay(2000);
lcd.write("\x1b[j");
lcd.write("\x1b[0h");
Serial.begin(9600);
myGPS.GPSinit(Serial, 9600, _3DFpin, _1PPSpin);
}
void loop()
{
//State machine for GPS
switch (state)
{
case(RESTART):
lcd.write("\x1b[j");
lcd.write("\x1b[0h");
lcd.print("No Sats");
state=PREFIXED;
delay(2000);
break;
//establish connection and set reference point
//This is done automatically on start up
//PREFIXED term used only to match existing states theme, it has no added meaning from the author
//This sets the reference point to where the system is restarted
case(PREFIXED):
mode = myGPS.getData(Serial);//Receive data from GPS
if (mode == GGA){//If GGAdata was received
//print to LCD: "Setting Reference"
lcd.write("\x1b[j");
lcd.write("\x1b[0h");
lcd.print("# of Sats: ");lcd.print(myGPS.getNumSats());
lcd.write("\x1b[j");
lcd.write("\x1b[0h");
lcd.print("Setting Reference");
delay(2000); //delays used to keep LCD prints long enough for user to read
//set reference latitude as current lattitude at reset
//myGPS.getLatitude() returns a string in Degrees-Minutes_Seconds format
referenceLatitude = myGPS.getLatitude();
//convert string data to float in Decimal-Degrees format
DDreferenceLatitude = convertDMStoDDlatitude(referenceLatitude);
//set reference longitude as current longitude at reset
//myGPS.getLongitude() returns a string in Degrees-Minutes_Seconds format
referenceLongitude = myGPS.getLongitude();
//convert string data to float in Decimal-Degrees format
DDreferenceLongitude = convertDMStoDDlongitude(referenceLongitude);
//display reference coordinates to LCD
lcd.write("\x1b[j");
lcd.write("\x1b[0h");
lcd.print("Reference Latitude: "); lcd.print(DDreferenceLatitude, 6);
delay(2000);
lcd.write("\x1b[j");
lcd.write("\x1b[0h");
//longitude around Seattle is a negative number but conversion function omits this
lcd.print("Reference Longitude: -"); lcd.print(DDreferenceLongitude, 6);
delay(2000);
//if a reference point has been set, change state, otherwise repeat this state until reference is set
if (DDreferenceLongitude != 0 && DDreferenceLatitude != 0){
state = NOTFIXED;
}
}
break;
case(NOTFIXED)://Look for satellites, display how many the GPS is connected to
mode = myGPS.getData(Serial);//Receive data from GPS
if (mode == GGA){//If GGAdata was received
lcd.write("\x1b[j");
lcd.write("\x1b[0h");
lcd.print("# of Sats: ");lcd.print(myGPS.getNumSats());lcd.print(" Position: Not Fixed");
delay(2000);
//get current latitude and convert to decimal degrees format
currentLatitude = myGPS.getLatitude();
DDcurrentLatitude = convertDMStoDDlatitude(currentLatitude);
//get current longitude and convert to decimal degrees format
currentLongitude = myGPS.getLongitude();
DDcurrentLongitude = convertDMStoDDlongitude(currentLongitude);
//print data to LCD
lcd.write("\x1b[j");
lcd.write("\x1b[0h");
lcd.print("Latitude: ");lcd.print(DDcurrentLatitude, 6);lcd.print(" Deg ");
delay(2000);
lcd.write("\x1b[j");
lcd.write("\x1b[0h");
lcd.print("Longitude: -");lcd.print(DDcurrentLongitude, 6);lcd.print(" Deg ");
delay(2000);
lcd.write("\x1b[j");
lcd.write("\x1b[0h");
directionMagnitude = spaceBetween(DDcurrentLongitude, DDreferenceLongitude, DDcurrentLatitude, DDreferenceLatitude);
lcd.print("Distance to Ref: ");lcd.print(directionMagnitude);
lcd.print(" Meters");
delay(2000);
directionDegrees = directionToDegrees(DDcurrentLongitude, DDreferenceLongitude, DDcurrentLatitude, DDreferenceLatitude);
lcd.write("\x1b[j");
lcd.write("\x1b[0h");
lcd.print("Angle to Ref: ");lcd.print(directionDegrees);
lcd.print(" Deg ");lcd.print(directionToCompass(directionDegrees));
delay(2000);
lcd.write("\x1b[j");
lcd.write("\x1b[0h");
lcd.print("Speed: ");lcd.print(myGPS.getSpeedKM(), 3);lcd.print(" km/hr");
delay(2000);
lcd.write("\x1b[j");
lcd.write("\x1b[0h");
lcd.print("Altitude: ");lcd.print(myGPS.getAltitude());lcd.print(" meters");
delay(2000);
if (myGPS.isFixed()){//When it is fixed, continue
state=FIXED;
}
}
break;
case(FIXED): //I am still unsure what Posisition Fixed Indicator (PFI) is used for / significance
//this code didn't seem to perform differently bewteen NOTFIXED and FIXED
if(myGPS.isFixed()){//Update data while there is a position fix
mode = myGPS.getData(Serial);
if (mode == GGA){//If GGAdata was received
//get current latitude and convert to decimal degrees format
currentLatitude = myGPS.getLatitude();
DDcurrentLatitude = convertDMStoDDlatitude(currentLatitude);
//get current longitude and convert to decimal degrees format
currentLongitude = myGPS.getLongitude();
DDcurrentLongitude = convertDMStoDDlongitude(currentLongitude);
//print data to LCD
lcd.write("\x1b[j");
lcd.write("\x1b[0h");
lcd.print("Latitude: ");lcd.print(DDcurrentLatitude, 6);lcd.print(" Deg ");
delay(2000);
lcd.write("\x1b[j");
lcd.write("\x1b[0h");
lcd.print("Longitude: -");lcd.print(DDcurrentLongitude, 6);lcd.print(" Deg ");
delay(2000);
lcd.write("\x1b[j");
lcd.write("\x1b[0h");
lcd.print("Altitude: ");lcd.print(myGPS.getAltitude());lcd.print(" meters");
delay(2000);
lcd.write("\x1b[j");
lcd.write("\x1b[0h");
lcd.print("# of Sats: ");lcd.print(myGPS.getNumSats());lcd.print(" Position: Fixed");
delay(2000);
lcd.write("\x1b[j");
lcd.write("\x1b[0h");
lcd.print("\n");
lcd.write("\x1b[j");
lcd.write("\x1b[0h");
lcd.print("Distance to Ref: ");lcd.print(spaceBetween(DDcurrentLongitude, DDreferenceLongitude, DDcurrentLatitude, DDreferenceLatitude));
lcd.print(" Meters");
delay(2000);
directionDegrees = directionToDegrees(DDcurrentLongitude, DDreferenceLongitude, DDcurrentLatitude, DDreferenceLatitude);
lcd.write("\x1b[j");
lcd.write("\x1b[0h");
lcd.print("Angle to Ref: ");lcd.print(directionDegrees);
lcd.print(" Deg ");lcd.print(directionToCompass(directionDegrees));
delay(2000);
lcd.write("\x1b[j");
lcd.write("\x1b[0h");
lcd.print("Speed: ");lcd.print(myGPS.getSpeedKM(), 3);lcd.print(" km/hr");
delay(2000);
}
}
else {
state=RESTART;//If PFI = 0, re-enter connecting state
}
break;
}
}
// functions for loop code, could go into header file
///**************************************************/
///* function: convertDMStoDDlatitude */ */
///* input: String
///* output: float
///* description: parses string for numerical values
///* gps coordinates captured in degrees minutes seconds mode
///* converts DMS format to Decimal Degrees format for calcualtions
///* convert by dividing minutes data by 60 and seconds data by 3600 then summing each with the degrees data
///* 1 degree is 60 minutes and there are 60 seconds in each minute
///**************************************************/
float convertDMStoDDlatitude(String lat){
float coordDegreesLat = 0.00;
String inStringLat = "";
switch (gpsdata) {
case (DEGREES):
inStringLat += lat.substring(0,2); //first two chars are degrees
coordDegreesLat += inStringLat.toFloat(); //convert to float, add to decimal degrees value
inStringLat = "";//clear temp string
gpsdata = MINUTES;//move to parse next part of string
case (MINUTES):
inStringLat += lat.substring(3,5); //skip char, next two are minutes
minutesToDegrees = (inStringLat.toFloat() / 60); //convert to float
coordDegreesLat += minutesToDegrees; //add to decimal degrees value
inStringLat = "";//clear temp string
gpsdata = SECONDS;//move to parse next part of string
case (SECONDS):
inStringLat += lat.substring(6,11); //skip char, last five are seconds with a decimal between two integers
secondsToDegrees = (inStringLat.toFloat() / 3600);//convert to float
coordDegreesLat += secondsToDegrees; //add to decimal degrees value
inStringLat = "";//clear temp string
gpsdata = DEGREES;//move to parse next part of string
}
return coordDegreesLat;
}
///**************************************************/
///* function: convertDMStoDDlongitude */ */
///* input: String
///* output: float
///* description: parses string for numerical values
///* gps coordinates captured in degrees minutes seconds mode
///* converts DMS format to Decimal Degrees format for calcualtions
///* convert by dividing minutes data by 60 and seconds data by 3600 then summing each with the degrees data
///* 1 degree is 60 minutes and there are 60 seconds in each minute
///* NOTE: seconds to degrees accuracy improved when normalizing difference in longitude degrees to Seattle area
///**************************************************/
float convertDMStoDDlongitude(String longit){
float coordDegreesLong = 0.0;
String inStringLong = "";
switch (gpsdata) {
case (DEGREES): //first 3 characters are degrees
inStringLong += longit.substring(0,3); //parse string
coordDegreesLong += inStringLong.toFloat(); //convert to float, add to decimal degrees value
inStringLong = ""; //clear temp string
gpsdata = MINUTES; //move to parse next part of string
case (MINUTES): //skip a char then next two are minutes
inStringLong += longit.substring(4,6); //parse string
minutesToDegrees = (inStringLong.toFloat() / 60); //convert to float
coordDegreesLong += minutesToDegrees; //add to decimal degrees value
inStringLong = ""; //clear temp string
gpsdata = SECONDS;//move to parse next part of string
case (SECONDS): //skip a char then last five are seconds with a decimal in the middle of four integers
inStringLong += longit.substring(7,12); //parse string
secondsToDegrees = cos(SeattleLatitude*PI/180)*(inStringLong.toFloat() / 3600); //convert to float
coordDegreesLong += secondsToDegrees; //add to decimal degrees value
inStringLong = ""; //clear temp string
gpsdata = DEGREES; //reset to beginning of string state for next function call
}
return coordDegreesLong;
}
///**************************************************/
///* function: spaceBetween */
///* input: 4 floats -> longitude and latitude of current posistion and reference posistion
///* output: float
///* description: takes gps coordinates of two locations and calculates distance between them in meters
///**************************************************/
float spaceBetween(float longitudeLocal, float longitudeOther, float latitudeLocal, float latitudeOther){
float longDiff = longitudeLocal - longitudeOther;
float latDiff = latitudeLocal - latitudeOther;
float longMeterPerDeg = 85390; //Seattle area distance between degrees longitude
float latMeterPerDeg = 111030; //Seattle area distance between degrees latitude
float longMeters = longDiff*longMeterPerDeg; //convert differnce of longitude degrees to meters
float latMeters = latDiff*latMeterPerDeg;//convert differnce of latitude degrees to meters
float directionMag = sqrt(longMeters*longMeters + latMeters*latMeters); //pythagorean distance formula
return directionMag;
}
///**************************************************/
///* function: directionToDegrees */
///* input: 4 floats -> longitude and latitude of current posistion and reference posistion
///* output: float
///* description: determine direction to reference from local coordinates in degrees
///**************************************************/
float directionToDegrees(float longitudeLocal, float longitudeOther, float latitudeLocal, float latitudeOther){
float longDiffTemp = 0;
float latDiffTemp = 0;
float longDiff = 0;
float latDiff = 0;
float directionToDegrees = 0.0;
int posLong = 0;
int posLat = 0;
latDiffTemp = (latitudeOther - latitudeLocal); // y axis
longDiffTemp = (longitudeOther - longitudeLocal);// x axis
//determine if difference in longitude and latitude is positive or negative
//this helps determine what quadrant the angle lies in
if (longDiff > 0){posLong = 1;}
if (latDiff > 0){posLat = 1;}
//converts negative value to positive for to ease calculation
if (longDiff < 0){longDiff = -1*longDiff;}
if (latDiff < 0){latDiff = -1*latDiff;}
//calculate angle
float directionToDegreesTemp = atan2(latDiff, longDiff) * (180 / PI);
//determine true angle by determining which quadrant then compensating appropriately from acrtan return
if (posLong){
if (posLat){ //quad 1
directionToDegrees = directionToDegreesTemp;
}
else{ //quad 4
directionToDegrees = 2*PI + directionToDegreesTemp;
}
}
else{
if (posLat){//quad 2
directionToDegrees = PI - directionToDegreesTemp;
}
else{ //quad 3
directionToDegrees = PI + directionToDegreesTemp;
}
}
return directionToDegrees;
}
///**************************************************/
///* function: directionToCompass */
///* input: float
///* output: float
///* description: determine cardinal direction to reference from direction degrees
///* set up such that East is zero degrees and degrees increase counter clockwise to simplify
///* a more correct approach would have North be zero degrees and report a bearing degree to East or West
///* might be good to implement some epsilon value for N, S, E, W directions so the degree value doesn't need to be exact
///**************************************************/
String directionToCompass(float directionDegrees){
String directionToCompass = "";
if (directionDegrees == 0.0 || directionDegrees == 360.0){directionToCompass = "E";}
else if (directionDegrees > 0.0 && directionDegrees < 30.0){directionToCompass = "NEE";}
else if (directionDegrees >= 30.0 && directionDegrees < 60.0){directionToCompass = "NE";}
else if (directionDegrees >= 60.0 && directionDegrees < 90.0){directionToCompass = "NNE";}
else if (directionDegrees = 90.0){directionToCompass = "N";}
else if (directionDegrees > 90.0 && directionDegrees < 120.0){directionToCompass = "NNW";}
else if (directionDegrees >= 120.0 && directionDegrees < 150.0){directionToCompass = "NW";}
else if (directionDegrees >= 150.0 && directionDegrees < 180.0){directionToCompass = "NWW";}
else if (directionDegrees = 180.0){directionToCompass = "W";}
else if (directionDegrees > 180.0 && directionDegrees < 210.0){directionToCompass = "SWW";}
else if (directionDegrees >= 210.0 && directionDegrees < 240.0){directionToCompass = "SW";}
else if (directionDegrees >= 240.0 && directionDegrees < 270.0){directionToCompass = "SSW";}
else if (directionDegrees = 270.0){directionToCompass = "S";}
else if (directionDegrees > 180.0 && directionDegrees < 210.0){directionToCompass = "SSE";}
else if (directionDegrees >= 210.0 && directionDegrees < 240.0){directionToCompass = "SE";}
else if (directionDegrees >= 240.0 && directionDegrees < 270.0){directionToCompass = "SEE";}
return directionToCompass;
}