الخميس، 14 فبراير 2019

قياس معدل ضربات القلب على شاشات الكريستال السائل 16x2

المكونات والإمدادات

Arduino Nano R3
MAX 30102 Heart rate monitor
Adafruit RGB Backlight LCD - 16x2
مقومة متغيرة

حول هذا المشروع

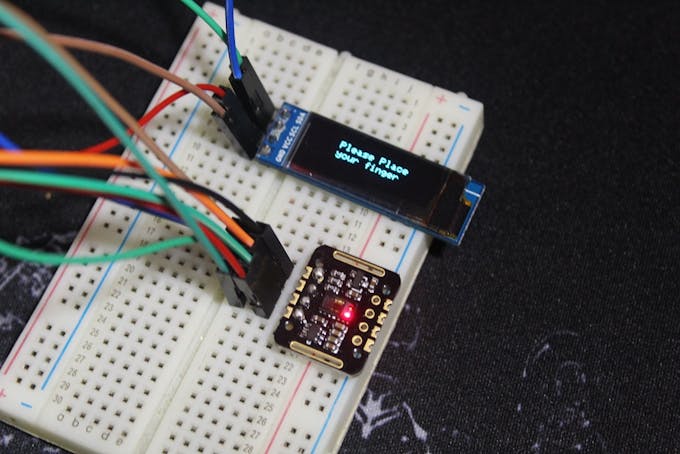
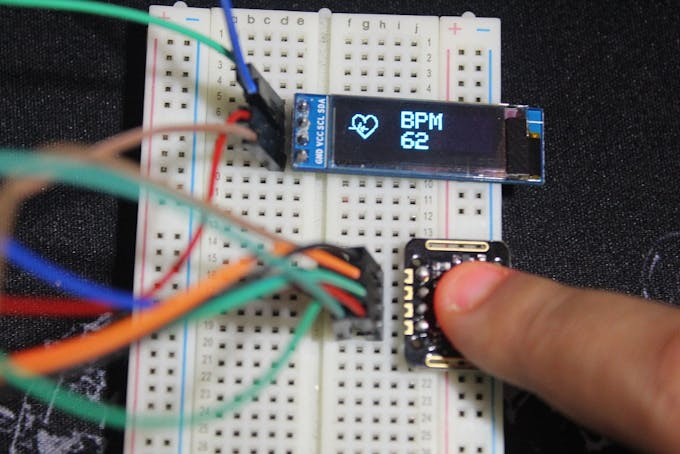
هذا هو رصد معدل ضربات القلب بسيط المصنوع من وحدة استشعار MAX30102. كتبت رمز بسيط يعتمد على مكتبات اردوينو وتظهر القيم على شاشة LCD 16 × 2. يعرض الصف الأول دقات وسطية في الدقيقة ، ويعرض الصف الثاني قيمة حزمة الأشعة المنعكسة. يجب أن تكون هذه القيمة ثابتة لجعل القراءات أكثر دقة.

كود البرمجة
/* 
  Hardware Connections (Breakoutboard to Arduino):
  -5V = 5V (3.3V is allowed)
  -GND = GND
  -SDA = A4 (or SDA)
  -SCL = A5 (or SCL)
  -INT = Not connected

  The MAX30105 Breakout can handle 5V or 3.3V I2C logic. We recommend powering the board with 5V
  but it will also run at 3.3V.
*/

#include <Wire.h>
#include "MAX30105.h"
#include <LiquidCrystal.h>

#include "heartRate.h"

MAX30105 particleSensor;
LiquidCrystal lcd(12, 11, 5, 4, 3, 2);

const byte RATE_SIZE = 4; //Increase this for more averaging. 4 is good.
byte rates[RATE_SIZE]; //Array of heart rates
byte rateSpot = 0;
long lastBeat = 0; //Time at which the last beat occurred

float beatsPerMinute;
int beatAvg;

void setup()
{
  Serial.begin(9600);
  
  lcd.begin(16, 2);
  Serial.println("Initializing...");

  // Initialize sensor
  if (!particleSensor.begin(Wire, I2C_SPEED_FAST)) //Use default I2C port, 400kHz speed
  {
    Serial.println("MAX30105 was not found. Please check wiring/power. ");
    while (1);
  }
  Serial.println("Place your index finger on the sensor with steady pressure.");

  particleSensor.setup(); //Configure sensor with default settings
  particleSensor.setPulseAmplitudeRed(0x0A); //Turn Red LED to low to indicate sensor is running
  particleSensor.setPulseAmplitudeGreen(0); //Turn off Green LED
}

void loop()
{
  long irValue = particleSensor.getIR();

  if (checkForBeat(irValue) == true)
  {
    //We sensed a beat!
    long delta = millis() - lastBeat;
    lastBeat = millis();

    beatsPerMinute = 60 / (delta / 1000.0);

    if (beatsPerMinute < 255 && beatsPerMinute > 20)
    {
      rates[rateSpot++] = (byte)beatsPerMinute; //Store this reading in the array
      rateSpot %= RATE_SIZE; //Wrap variable

      //Take average of readings
      beatAvg = 0;
      for (byte x = 0 ; x < RATE_SIZE ; x++)
        beatAvg += rates[x];
      beatAvg /= RATE_SIZE;
    }
  }

  Serial.print("IR=");
  Serial.print(irValue);
  Serial.print(", BPM=");
  Serial.print(beatsPerMinute);
  Serial.print(", Avg BPM=");
  Serial.print(beatAvg);

  if (irValue < 50000)
    Serial.print(" No finger?");

  Serial.println();

  lcd.setCursor(0,0);
  lcd.print("BPM: ");
  lcd.print(beatAvg);

  lcd.setCursor(0,1);
  lcd.print(" IR: ");
  lcd.print(irValue);
}


الجمعة، 8 فبراير 2019

قياس معدل ضربات القلب بالاردوينو

المواد المطلوبة
اردوينو اونو او جينون
Adafruit OLED 128x32
منبه
Maxim Integrated MAX30102 مقياس التأكسج النبضي عالي الحساسية ومستشعر معدل ضربات القلب للصحة القابلة للارتداء

حول هذا المشروع
مقدمة
مرحبا ، في هذا البرنامج التعليمي نحن gonna واجهة MAX30102: نبض مقياس التأكسج ومراقبة معدل ضربات القلب وحدة مع مجلس اردوينو UNO ، ومن ثم جعل مشروع لقياس BPM باستخدام هذه الوحدة + شاشة OLED و الطنانة.

BPM هي "نبضة في الدقيقة" وهي حول 65-75 بينما تستريح لشخص عادي ، قد يكون لألعاب القوى أقل من ذلك ، و SpO2 هو مستوى تشبع الأكسجين ، وبالنسبة للشخص العادي يكون أعلى من 95٪.

يمكن العثور على MAX30102 في وحدات مختلفة ، ولدي نسخة WAVGAT ، وهي ليست مشكلة طالما IC هو MAX30102.

الاختبارات:
الرموز التي استخدمتها في البرنامج التعليمي واضحة تمامًا وهي مجرد أمثلة من مكتبة Sparkfun_MAX3010x.

بالنسبة للشفرة التي قمت بها من أجل OLED و Buzzer ، إنها نسخة معدلة من مثال HeartRate ، فإنه يطلب منك وضع إصبعك على المستشعر.

بمجرد وضع إصبعك ، حافظ على الهدوء لفترة من الوقت ، حتى تبدأ في سماع "Beeps" الجرس المزامن مع دقات قلبك أو تتم مزامنة الرسوم المتحركة OLED معها ، وبعد ذلك يمكنك قراءة BPM الصحيح.

N.B: في الكود أقوم بالفعل بطباعة متوسط ​​BPM ، نظرًا لأن متوسط ​​4 BPM هو أكثر دقة ، فقط أعطه بعض الوقت.


جعل الصور النقطية ل OLED
القلب (الصغير) الذي تراه هو صورة نقطية ، وفي كل مرة يكتشف المستشعر نبض القلب ، ننتقل إلى صورة قلب (كبيرة) أخرى لفترة من الوقت ، ويعطي انطباعًا عن دقات قلب بجانب صفير من الجرس.

فيما يلي الصور النقطية في التعليمة البرمجية التي نسميها لاحقاً على التعليمة البرمجية


لجعل هذه ، ابحث عن صورة (أسود مع خلفية بيضاء) للواتيف الذي تريد رؤيته في الشاشة فقط لا تنس الحجم ، الذي أستخدمه هو 128x32 بكسل والصور أصغر من ذلك (32x32 بيكسل ) و (24 × 21 بكسل)


تنزيل مساعد LCD وفتحه (بعض الخطوات أدناه)

وهنا "الأرقام" الخاصة بك
وإليكم كيف اتصلت به في الكود
display.drawBitmap(5, 5, logo2_bmp, 24, 21, WHITE);
وهذا يعني
 display.drawBitmap(Starting x pos, Starting y pos, Bitmap name, Width, Height, Color);
وكما ترون في الرمز ، يتم استدعاء واحد عندما يتم الكشف عن إصبع والآخر إذا تم الكشف عن ضربات القلب.

وهنا تذهب لجعل ما تريد.
/* This code works with MAX30102 + 128x32 OLED i2c + Buzzer and Arduino UNO
 * It's displays the Average BPM on the screen, with an animation and a buzzer sound
 * everytime a heart pulse is detected
 * It's a modified version of the HeartRate library example
 * Refer to www.surtrtech.com for more details or SurtrTech YouTube channel
 */

#include <Adafruit_GFX.h>        //OLED libraries
#include <Adafruit_SSD1306.h>
#include <Wire.h>
#include "MAX30105.h"           //MAX3010x library
#include "heartRate.h"          //Heart rate calculating algorithm

MAX30105 particleSensor;

const byte RATE_SIZE = 4; //Increase this for more averaging. 4 is good.
byte rates[RATE_SIZE]; //Array of heart rates
byte rateSpot = 0;
long lastBeat = 0; //Time at which the last beat occurred
float beatsPerMinute;
int beatAvg;

#define SCREEN_WIDTH 128 // OLED display width, in pixels
#define SCREEN_HEIGHT 32 // OLED display height, in pixels
#define OLED_RESET    -1 // Reset pin # (or -1 if sharing Arduino reset pin)

Adafruit_SSD1306 display(SCREEN_WIDTH, SCREEN_HEIGHT, &Wire, OLED_RESET); //Declaring the display name (display)

static const unsigned char PROGMEM logo2_bmp[] =
{ 0x03, 0xC0, 0xF0, 0x06, 0x71, 0x8C, 0x0C, 0x1B, 0x06, 0x18, 0x0E, 0x02, 0x10, 0x0C, 0x03, 0x10,              //Logo2 and Logo3 are two bmp pictures that display on the OLED if called
0x04, 0x01, 0x10, 0x04, 0x01, 0x10, 0x40, 0x01, 0x10, 0x40, 0x01, 0x10, 0xC0, 0x03, 0x08, 0x88,
0x02, 0x08, 0xB8, 0x04, 0xFF, 0x37, 0x08, 0x01, 0x30, 0x18, 0x01, 0x90, 0x30, 0x00, 0xC0, 0x60,
0x00, 0x60, 0xC0, 0x00, 0x31, 0x80, 0x00, 0x1B, 0x00, 0x00, 0x0E, 0x00, 0x00, 0x04, 0x00,  };

static const unsigned char PROGMEM logo3_bmp[] =
{ 0x01, 0xF0, 0x0F, 0x80, 0x06, 0x1C, 0x38, 0x60, 0x18, 0x06, 0x60, 0x18, 0x10, 0x01, 0x80, 0x08,
0x20, 0x01, 0x80, 0x04, 0x40, 0x00, 0x00, 0x02, 0x40, 0x00, 0x00, 0x02, 0xC0, 0x00, 0x08, 0x03,
0x80, 0x00, 0x08, 0x01, 0x80, 0x00, 0x18, 0x01, 0x80, 0x00, 0x1C, 0x01, 0x80, 0x00, 0x14, 0x00,
0x80, 0x00, 0x14, 0x00, 0x80, 0x00, 0x14, 0x00, 0x40, 0x10, 0x12, 0x00, 0x40, 0x10, 0x12, 0x00,
0x7E, 0x1F, 0x23, 0xFE, 0x03, 0x31, 0xA0, 0x04, 0x01, 0xA0, 0xA0, 0x0C, 0x00, 0xA0, 0xA0, 0x08,
0x00, 0x60, 0xE0, 0x10, 0x00, 0x20, 0x60, 0x20, 0x06, 0x00, 0x40, 0x60, 0x03, 0x00, 0x40, 0xC0,
0x01, 0x80, 0x01, 0x80, 0x00, 0xC0, 0x03, 0x00, 0x00, 0x60, 0x06, 0x00, 0x00, 0x30, 0x0C, 0x00,
0x00, 0x08, 0x10, 0x00, 0x00, 0x06, 0x60, 0x00, 0x00, 0x03, 0xC0, 0x00, 0x00, 0x01, 0x80, 0x00  };


void setup() {  
  display.begin(SSD1306_SWITCHCAPVCC, 0x3C); //Start the OLED display
  display.display();
  delay(3000);
  // Initialize sensor
  particleSensor.begin(Wire, I2C_SPEED_FAST); //Use default I2C port, 400kHz speed
  particleSensor.setup(); //Configure sensor with default settings
  particleSensor.setPulseAmplitudeRed(0x0A); //Turn Red LED to low to indicate sensor is running

}

void loop() {
 long irValue = particleSensor.getIR();    //Reading the IR value it will permit us to know if there's a finger on the sensor or not
                                           //Also detecting a heartbeat
if(irValue > 7000){                                           //If a finger is detected
    display.clearDisplay();                                   //Clear the display
    display.drawBitmap(5, 5, logo2_bmp, 24, 21, WHITE);       //Draw the first bmp picture (little heart)
    display.setTextSize(2);                                   //Near it display the average BPM you can display the BPM if you want
    display.setTextColor(WHITE); 
    display.setCursor(50,0);                
    display.println("BPM");             
    display.setCursor(50,18);                
    display.println(beatAvg); 
    display.display();
    
  if (checkForBeat(irValue) == true)                        //If a heart beat is detected
  {
    display.clearDisplay();                                //Clear the display
    display.drawBitmap(0, 0, logo3_bmp, 32, 32, WHITE);    //Draw the second picture (bigger heart)
    display.setTextSize(2);                                //And still displays the average BPM
    display.setTextColor(WHITE);             
    display.setCursor(50,0);                
    display.println("BPM");             
    display.setCursor(50,18);                
    display.println(beatAvg); 
    display.display();
    tone(3,1000);                                        //And tone the buzzer for a 100ms you can reduce it it will be better
    delay(100);
    noTone(3);                                          //Deactivate the buzzer to have the effect of a "bip"
    //We sensed a beat!
    long delta = millis() - lastBeat;                   //Measure duration between two beats
    lastBeat = millis();

    beatsPerMinute = 60 / (delta / 1000.0);           //Calculating the BPM

    if (beatsPerMinute < 255 && beatsPerMinute > 20)               //To calculate the average we strore some values (4) then do some math to calculate the average
    {
      rates[rateSpot++] = (byte)beatsPerMinute; //Store this reading in the array
      rateSpot %= RATE_SIZE; //Wrap variable

      //Take average of readings
      beatAvg = 0;
      for (byte x = 0 ; x < RATE_SIZE ; x++)
        beatAvg += rates[x];
      beatAvg /= RATE_SIZE;
    }
  }

}
  if (irValue < 7000){       //If no finger is detected it inform the user and put the average BPM to 0 or it will be stored for the next measure
     beatAvg=0;
     display.clearDisplay();
     display.setTextSize(1);                    
     display.setTextColor(WHITE);             
     display.setCursor(30,5);                
     display.println("Please Place "); 
     display.setCursor(30,15);
     display.println("your finger ");  
     display.display();
     noTone(3);
     }

}
SparkFun MAX3010x مكتبة

Adafruit SSD1306

Adafruit GFX مكتبة