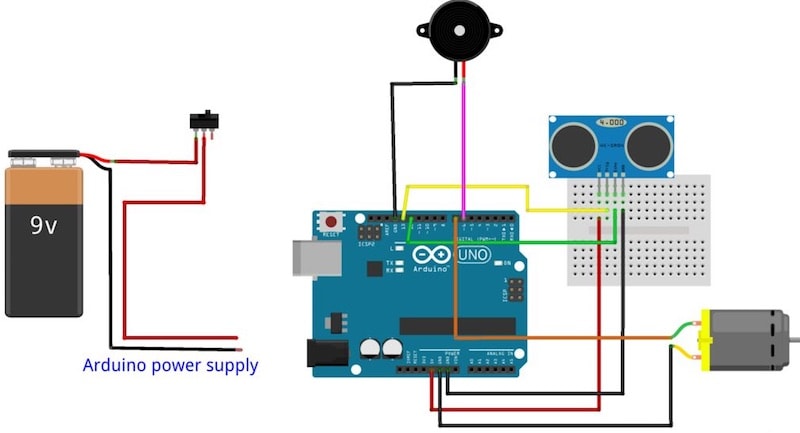
الخميس، 15 مارس 2018

استخدام اردوينو ووحدة الموجات فوق الصوتية لتحديد مستوى المياه في خزان.

المواد المطلوبة

ATMega328P او اردوينو بأي نوع كان
متحسس الترا سونيك HC-SR04
مقاومة 10K
كرستال 16Mhz
منظم LM7805 5V
بطارية 9V 
مكثف 10uF
اسلاك ربط مع لوحة الربط

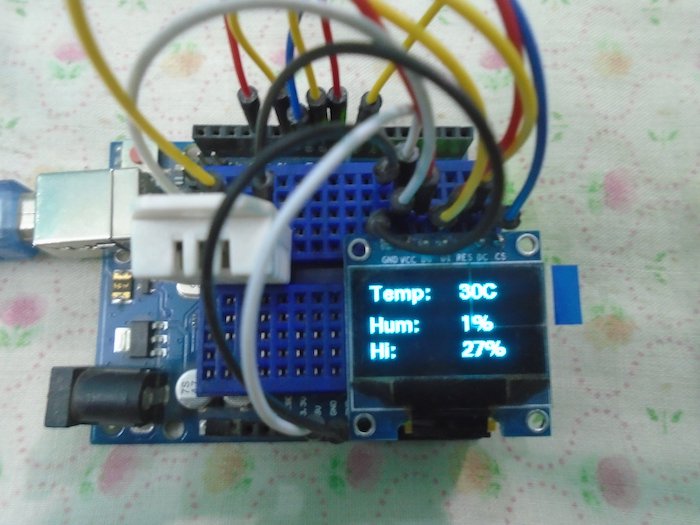
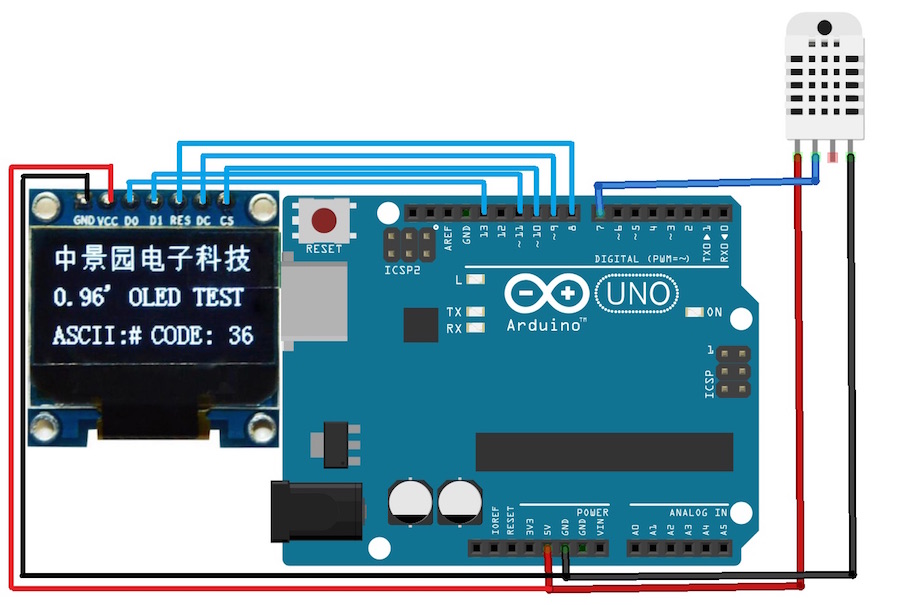
معرفة كمية المياه في الخزان العلوي يمكن أن تكون مهمة شاقة. عادة ، سوف ينتهي بك المطاف صعود الدرج إلى الخزان والتحقق من مستوى يدويا أو عليك سماع المياه تفيض من الأعلى. لكن المؤشرات الإلكترونية لمستوى المياه هذه الأيام متاحة لإصلاح هذه المشكلة ، لكنها غالباً ما تأتي مع ثمن باهظ ، وعادة ما يكون من الصعب تثبيتها. تستخدم معظم الأنظمة المتاحة الأقطاب الكهربائية المغمورة أو المفاتيح العائمة ، والتي يمكن أن تكون صداعًا على المدى الطويل. نقدم طريقة مختلفة لمعرفة مستوى المياه باستخدام وحدة الموجات فوق الصوتية مع اردوينو. تكمن ميزة هذه الطريقة في أنها غير تلامسية ، لذا لن تؤثر مشكلات مثل تآكل الأقطاب الكهربائية على هذا النظام. وعلاوة على ذلك ، فإن مؤشر مستوى الماء في اردوينو يكون أسهل في التركيب من الأنظمة العادية.


كود البرمجة

int d = 18; //Enter depth of your tank here in centimeters int trig = 11; // Attach Trig of ultrasonic sensor to pin 11 int echo = 10; // Attach Echo of ultrasonic sensor to pin 10 int pin1 = 2;//Highest level int pin2 = 3; int pin3 = 4; int pin4 = 5; int pin5 = 6; int pin6 = 7;//Lowest evel void setup() { pinMode (pin1, OUTPUT);// Set pins to output for controlling I/O pinMode (pin2, OUTPUT); pinMode (pin3, OUTPUT); pinMode (pin4, OUTPUT); pinMode (pin5, OUTPUT); pinMode (pin6, OUTPUT); } void loop() { digitalWrite(pin1, LOW);//Resetting the LEDs to off state digitalWrite(pin2, LOW); digitalWrite(pin3, LOW); digitalWrite(pin4, LOW); digitalWrite(pin5, LOW); digitalWrite(pin5, LOW); // Establish variables for duration of the ping, // and the distance result in inches and centimeters: long duration, in, cm; //'in' is inches and 'cm' is centimeter // The PING is triggered by a HIGH pulse of 2 or more microseconds. // Give a short LOW pulse beforehand to ensure a clean HIGH pulse: pinMode(trig, OUTPUT); digitalWrite(trig, LOW); delayMicroseconds(2); digitalWrite(trig, HIGH); delayMicroseconds(5); digitalWrite(trig, LOW); // The same pin is used to read the signal from the PING: a HIGH // pulse whose duration is the time (in microseconds) from the sending // of the ping to the reception of its echo off of an object. pinMode(echo, INPUT); duration = pulseIn(echo, HIGH); // Convert the time into a distance in = microsecondsToInches(duration); cm = microsecondsToCentimeters(duration); delay(100);// To save battery,remove if felt inconvenient if (in < 6 * d / 7)// Else is included to light only one led at a level and thus save battery charge digitalWrite(pin1, HIGH); else if (in < 5 * d / 6) digitalWrite(pin2, HIGH); else if (in < 4 * d / 6) digitalWrite(pin3, HIGH); else if (in < 3 * d / 6) digitalWrite(pin4, HIGH); else if (in < 2 * d / 6) digitalWrite(pin5, HIGH); else if (in < 1 * d / 6) digitalWrite(pin5, HIGH); }


الأربعاء، 14 مارس 2018

قراءة مقاييس الحرارة والرطوبة باستخدام اردوينو وعرضها على شاشة OLED

المواد المطلوبة 

اردوينو اونو
شاشة 128X64 OLED
حساس DHT22 للحرارة والرطوبة
اسلاك التوصيل - لوحة الربط

في هذا المشروع ، سنقوم بعمل ميزان حرارة و مقياس رطوبة OLED من اردوينو. سوف نقرأ درجة الحرارة والرطوبة من مستشعر DHT22 ثم نعرض البيانات على شاشة OLED.


كود اردوينو

#include   
#include "DHT.h"
#define DHTPIN 7 
#define DHTTYPE DHT22 
DHT sensor(DHTPIN, DHTTYPE);

U8GLIB_SH1106_128X64 oled (13, 11, 10, 9, 8);  

void setup() 
{
sensor.begin(); 
oled.firstPage();  
do 
{
oled.setFont(u8g_font_fur14);    //setting the font size
//Printing the data on the OLED   
oled.drawStr(20, 15, "Welcome"); 
oled.drawStr(40, 40, "To");
oled.drawStr(5, 60, "DIYHACKING");  
}  while( oled.nextPage() );
delay(5000);
}

void loop()
{
float h = sensor.readHumidity();   //Reading the humidity value
float t = sensor.readTemperature();   //Reading the temperature value
float fah = sensor.readTemperature(true); //Reading the temperature in Fahrenheit
if (isnan(h) || isnan(t) || isnan(fah)) {  //Checking if we are receiving the values or not
Serial.println("Failed to read from DHT sensor!");
return;
}
float heat_index = sensor.computeHeatIndex(fah, h); //Calculating the heat index in Fahrenheit
float heat_indexC = sensor.convertFtoC(heat_index);    //Calculating the heat index in Celsius

oled.firstPage();  
do 
{
oled.setFont(u8g_font_fub11);    //setting the font size
//Printing the data on the OLED
oled.drawStr(0, 15, "Temp: ");
oled.drawStr(0, 40, "Hum: ");
oled.drawStr(0, 60, "Hi: ");
oled.setPrintPos(72, 15);       //setting the dimensions to print the temperature
oled.print(t, 0);
oled.println("C"); 
oled.setPrintPos(72, 40);  //setting the dimensions to print the humidity
oled.print(h, 0);     
oled.println("%");
oled.setPrintPos(72, 60);  //setting the dimensions to print the heat index
oled.print(heat_indexC, 0);
oled.println("%");
}  
while( oled.nextPage() );
delay(2000);  
}

الجمعة، 9 مارس 2018

صنع قصب الذكي للمعاقين بصريا بواسطة اردوينو

يستخدم هذا القصب الذكي البسيط اردوينو ومحرك الاهتزاز للهواتف الخلوية القديمة للمساعدة في اكتشاف العقبات.

المواد المطلوبة

اردوينو اونو
بطارية 9 فولت
حافظة بطارية
صافرة
اسلاك التوصيل
مفتاح التشغيل
هزاز ( يمكن استخراجه من هاتف قديم)
انبوب ماء مطاطي


بعد استخراج الهزاز يربط على لوح كالاتي

تربط المكونات كالاتي


المحصلة النهائية للدائرة تكون كالاتي


كود الاردوينو


#define trigPin 13 #define echoPin 12 #define motor 7 #define buzzer 6 void setup() { pinMode(trigPin, OUTPUT); pinMode(echoPin, INPUT); pinMode(motor, OUTPUT); pinMode(buzzer,OUTPUT); } void loop() { long duration, distance; digitalWrite(trigPin, LOW); delayMicroseconds(2); digitalWrite(trigPin, HIGH); delayMicroseconds(10); digitalWrite(trigPin, LOW); duration = pulseIn(echoPin, HIGH); distance = (duration/2) / 29.1; if (distance < 70) // Checking the distance, you can change the value { digitalWrite(motor,HIGH); // When the the distance below 100cm digitalWrite(buzzer,HIGH); } else { digitalWrite(motor,LOW);// when greater than 100cm digitalWrite(buzzer,LOW); } delay(500); }


الاثنين، 5 مارس 2018

ركن السيارة في المرأب( كراج ) باستخدام اردوينو

الهدف من المشروع
لجعل اسلوب حياتك سهلة عن طريق تثبيت نظام تجنب الاصطدام في المرآب لمساعدة  بأمان دون ضرب جدار المرآب.
لاستخدام جهاز استشعار بالموجات فوق الصوتية لحساب مسافة السيارة من جدار المرآب وعرضه باستخدام الأخضر والأصفر والأحمر المصابيح. لون المصابيح يشير إلى ما إذا كان للحفاظ على التحرك، إبطاء، توقف أو العودة.

المواد المطلوبة


ربط الاجزاء


الربط النهائي


كود البرمجة
int trigPin = PD5; 

int echoPin = PD6; // Sensor Echo pin connected to Arduino pin D6

int redLED = PD2; // Red LED connected to pin D2

int yellowLED = PD3; // Yellow LED connected to pin D3

int greenLED = PD4; // Green LED connected to pin D4

int buzzer = A0; // Buzzer connected to Analogue pin A0

long TempDistance = 0; // A variable to store the temporary distance

int counter = 0; // Counter value to check if the object has stopped moving

void setup() {

Serial.begin(9600);

pinMode(trigPin, OUTPUT);

pinMode(echoPin, INPUT);

pinMode(redLED, OUTPUT);

pinMode(greenLED, OUTPUT);

pinMode(yellowLED, OUTPUT);

pinMode(buzzer, OUTPUT);

}

void loop() {

long duration, Distance;

digitalWrite(trigPin, LOW);

delayMicroseconds(2);

digitalWrite(trigPin, HIGH);

delayMicroseconds(10);

digitalWrite(trigPin, LOW);

duration = pulseIn(echoPin, HIGH);

Distance = (duration/2) / 74; // Distance in Inches

if(counter < 20){ // Do the rest if the car is still moving

if (Distance > 200) { // Nothing in the garrage

turnThemAllOff();

}

if ((Distance > 55) && (Distance <= 200)) { // Turn on Green LED

digitalWrite(greenLED, HIGH);

digitalWrite(yellowLED, LOW);

digitalWrite(redLED, LOW);

noTone(buzzer);

}

if ((Distance > 15) && (Distance <= 55)) { // Turn on Yellow LED

digitalWrite(yellowLED, HIGH);

digitalWrite(redLED, LOW);

digitalWrite(greenLED,LOW);

noTone(buzzer);

}

if (Distance <= 15) { // Turn on Red LED

digitalWrite(redLED, HIGH);

digitalWrite(greenLED,LOW);

digitalWrite(yellowLED, LOW);

noTone(buzzer);

}

if (Distance < 8) { // Item is way to close - start the buzzer

tone(buzzer, 500);

}

}

if ((Distance == TempDistance) || ((Distance+1) == TempDistance) || ((Distance-1) == TempDistance)){

if(counter >= 20){ // Turn off the lights if the object hasn't moved for 20 cycles (no change in distance)

Serial.println("No movement detected, turning off the lights");

turnThemAllOff();

} else {

counter++;

}

} else {

counter = 0; // Reset counter if there is a movement

}

TempDistance = Distance;

Serial.print(Distance);

Serial.println(" inches");

Serial.print("Counter : ");

Serial.println(counter); delay(500); }

// Function to turn the LEDs off

void turnThemAllOff(){

digitalWrite(redLED, LOW);

digitalWrite(greenLED,LOW);

digitalWrite(yellowLED, LOW);

noTone(buzzer);

}

الثلاثاء، 27 فبراير 2018

تسجيل بيانات درجة الحرارة بواسطة اردوينو

المواد المطلوبة

Arduino Uno

DS3231 Real Time Clock
Mini SD card module
LM35 temperature sensor

في هذا المشروع،  نقوم بتسجيل قراءة اردوينو لدرجة الحرارة التي سوف تحصل على قيمة درجة الحرارة من مستشعر درجة الحرارة LM35 والوقت من وحدة الوقت الحقيقي DS3231 على مدار الساعة. ثم سنقوم بتخزين هذه القيم في ملف بطاقة sd  بعد ذلك، سوف نقوم بالوصول إلى هذا الملف من جهاز كمبيوتر وإنشاء مخطط لهذه القيم في ميكروسوفت إكسيل.


تربط  DS3231 مع اردوينو  على النحو التالي:

  • GND مع GND الاردوينو
  • VCC ل DS3231 مع 5فولت في الاردوينو 
  • SDA ل DS3231 مع A4 في الاردوينو 
  • SCL مع   A5 في اردوينو
ربط SD مع الاردوينو
CS يربط مع المنفذ 10 على الاردوينو
SCK يربط مع المنفذ 13 على الاردوينو
MOSI يربط مع المنفذ 11 على الاردوينو
MISO يربط مع المنفذ 12 على الاردوينو
VCC يربط مع المنفذ 5V على الاردوينو
GND  يربط مع المنفذ GND على الاردوينو

ربط متحسس الحرارة LM35 مع اردوينو

VCC يربط مع المنفذ 5V على الاردوينو
OUT يربط مع المنفذ A0 على الاردوينو
GND  يربط مع المنفذ GND على الاردوينو


كود الوقت

#include <DS3231.h>

DS3231  rtc(SDA, SCL);


void setup()

{  

  rtc.begin();

   rtc.setDOW(WEDNESDAY);     

  rtc.setTime(12, 0, 0);     

  rtc.setDate(1, 1, 2014);   

}


void loop()

{

}
الكود
#include <SD.h>

#include <SPI.h>

#include <DS3231.h>

File data_file;

DS3231  rtc(SDA, SCL);


const int lm35_pin = A0; 

int temperature;  

int chip_select_pin = 10;     //pin 53 for arduino mega 2560


void setup() {

  Serial.begin(9600);

  rtc.begin();  

  pinMode(lm35_pin, INPUT);

  pinMode(chip_select_pin, OUTPUT);

  if (SD.begin())

  {

    Serial.println("Initialization Successful. Ready to use");

  } else

  {

    Serial.println("Initialization failed. Check your pin connections or change your SD card");

    return;

  }


}


void loop() {

  temperature = analogRead(lm35_pin);

  temperature = (temperature*500)/1023;

  data_file = SD.open("test.txt", FILE_WRITE);

  if (data_file) {    

    Serial.print(rtc.getTimeStr());

    data_file.print(rtc.getTimeStr());

    Serial.print(",");

    data_file.print(",");    

    Serial.println(temperature);

    data_file.println(temperature);

    data_file.close();

  }


  else {

    Serial.println("error opening your SD card file. Try again");

  }

  delay(3000);

}


الاثنين، 26 فبراير 2018

السيطرة على عمل محرك باستخدام متحسس الحرارة + اردوينو

جعل مروحة  تدور تلقائيا عند درجة حرارة الغرفة تصل إلى درجة معينة.

المواد المطلوبة

اردوينو اونو 1

شاشة LCD 2*16
متحسس الحرارة والرطوبة DHT22
محرك تيار مستمر
بطارية 9 فولت
مقاومة متغيرة 10K
لوحة الربط

في هذه المقالة، وأنت تسير لمعرفة المزيد عن اردوينو التحكم في درجة الحرارة مروحة باستخدام استشعار DHT22 والتتابع. سوف نستخدم جهاز استشعار DHT22 للحصول على قيمة درجة الحرارة وسوف نقوم بطباعة هذه القيمة درجة الحرارة على شاشات الكريستال السائل. ثم سوف نقوم بفحص ما إذا كانت قيمة درجة الحرارة أكبر من 35 أم لا، إذا كانت درجة الحرارة ستكون أكبر من 35، ثم سيتم تفعيل التتابع وسوف تبدأ مروحة بالتدوير.


أولا وقبل كل شيء تربط  الشاشة الكرستالية مع اردوينو على النحو التالي:
اربط VSS مع الارضي
اربط VDD مع +5V
اربط V0 مع المقاومة المتغيرة ( الرجل الوسطي) الارجل الاخرى للمقاومة المتغيرة (على الجوانب) تربط احداها مع 5V والاخرى مع الارضي
اربط RS مع المنفذ 2 في الاردوينو
اربط R/W مع ارضي
اربط E مع المنفذ 3 في الاردوينو
اربط من D4 الى D7 مع المنافذ 4, 5, 6, 7
اربط المنفذ 15 مع 5V من خلال مقاومة 220ohm
اربط المنفذ 16 مع الارضي

يربط المرحل ( ريلاي) على النحو التالي

VCC مع 5V
IN مع المنفذ 9 في الاردوينو
GND مع الارضي
الطرف الاخر من المرحل يربط مع الموجب في البطارية والنقطة المشتركة للمرحل يربط مع النقطة NC الى السالب
كما ويربط المتحسس كما يلي
المنفذ 1 من المتحسس يربط مع VCC في الاردوينو
المنفذ 2 من المتحسس يربط مع المنفذ 8 في الاردوينو
المنفذ 4 يربط مع الارضي في الاردوينو


الكود
#include "DHT.h" #include "LiquidCrystal.h" LiquidCrystal lcd(7, 8, 9, 10, 11 ,12); #define DHTPIN 6 #define DHTTYPE DHT22 DHT sensor(DHTPIN, DHTTYPE); int relay_pin = 9; void setup() { lcd.begin(16,2); sensor.begin(); pinMode(relay_pin, OUTPUT); digitalWrite(relay_pin, HIGH); } void loop() { lcd.clear(); float t = sensor.readTemperature(); //reading the temperature from the sensor // Checking if the sensor is sending values or not if (isnan(t)) { lcd.print("Failed"); delay(1000); return; } lcd.setCursor(0,0); lcd.print("Temp: "); lcd.print(t); lcd.print(" C"); if (t > 35){ digitalWrite(relay_pin, LOW); lcd.setCursor(0,1); lcd.print("Fan is ON "); delay(10); } else{ digitalWrite(relay_pin, HIGH); lcd.setCursor(0,1); lcd.print("Fan is OFF "); } delay(2000); }